+(AppStore *) Timera: make your window in time
 It’s time to tell the story about my contribution to very interesting and perspective project with a quite unique name Timera (origins from time and camera). Project founders have been looking a person for iOS developer position exactly at the same time when I’ve been looking new self-education frontiers for myself. The idea of project is quite simple. Its visual representation can be seen on featured post picture (the image is clickable). The user is provided with tool for making a time tunnel by combining two photos made on the same place in different time moments: first from past and second must be taken by user’s mobile device. The idea seemed interesting for me so I immediately integrated myself to the development process which promised a lot of difficult and interesting challenges.
First of all I’d like to say a couple of words about global architecture. A central place is a server performing back-end, front-end, data storage and web-api roles. I’m not going to describe the server side in details because I don’t deal with it. I just can say that production version is running on cloud hosting from Microsoft and a classic stack (IIS+MSSQL+ASP.NET) was used to build a server-side. System front-end (http://www.timera.com) provides a feed with pictures made by users. Also it has a number of social network features like subscriptions, commenting, like/dislike, sharing to other social networks. Also user can upload old photo. What does it mean and what is it for? The answer is below.
There is another sufficient part of architecture – mobile application. It is implemented for iOS, Android and Windows Phone. The functionality is almost identical to a website
except one exclusive feature. It is a timeragraphy. This word (timeragraphy) was specially invented to bring a clarity to a development process. It was produced by David Webb – timera founder. He was impressed by works of petersburg photographer Sergey Larenkov who did a series of photos dedicated to block out of Leningrad during WW2 and who used a timeragraphy technique first. It’s time to explain timeragraphy process and how it is implemented in timera mobile app.
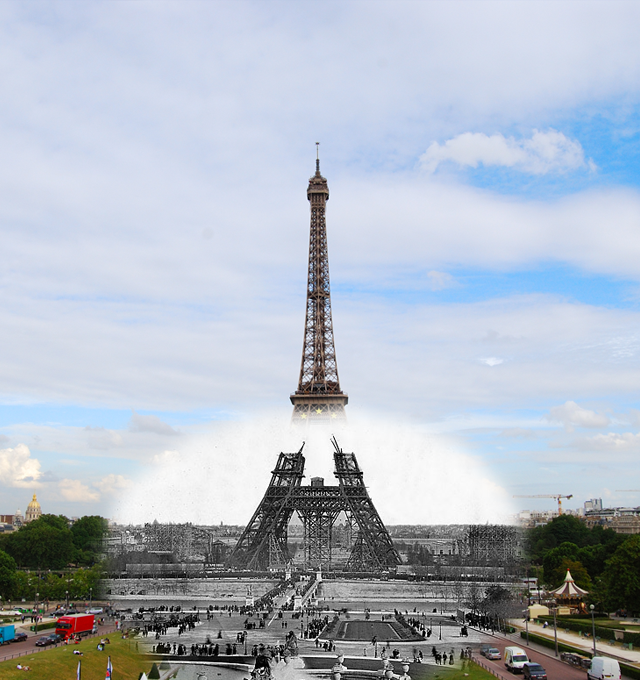
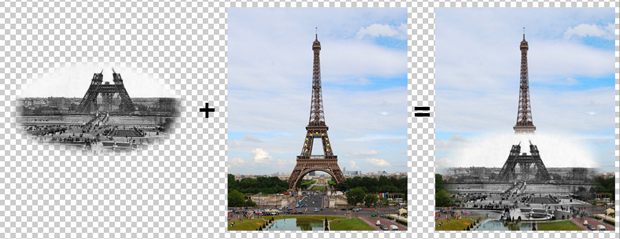
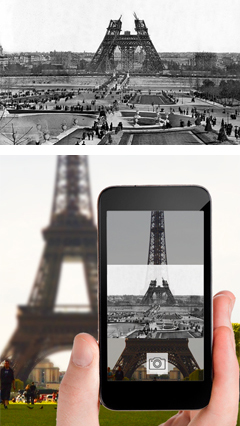 Assume we have an old photograph of the Eiffel Tower. I personally like the picture of 1889, where we can see the tower was built only up to the first level. To create timera-shot, you need to find proper point of view and the angle from which was created by an old photograph, take a photo, upload it on the computer and combine two images together in graphical editor using different filters and gradients. The task is not trivial. But it is for all Timera application users. The whole process is maximally simplified and can even be quite funny. The user opens a screen with a map on which the blue pins specify old photos available in a particular location. The application allows to display the user location and facilities around automatically . When user makes a choice a camera screen is opening. There are both the limage from the camera, and semi-transparent old photo on the screen (a transparency can be changed). User can move the old photo on the screen, change its size by touch-screen features, thus producing a primary aim. After the picture is taken, the screen opens where and can perform final alignment.
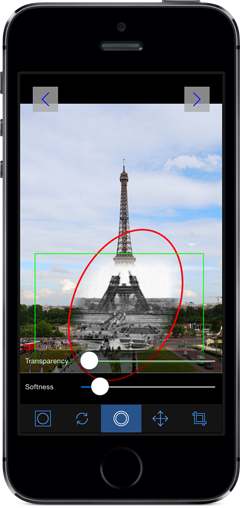 The most interesting is beginning on the third screen, which used to configure a time-tunnel. There is a toolbar with various tools, such as:
– Transparency slider and field borders time tunnel (transparency and softness)
– Turn the time tunnel around axis
– A swap function (swaps the old and new photos, you have an old goes into the background, and the new on the front)
– Changing the shape of the time tunnel: elliptical or rectangular
– Trimming (crop)
In all modes you can adjust the size and position of the time-tunnel using the screen gestures.
Does it seem sparse? Perhaps, but even with this set of tools you can produce very nice compositions. Also, it is planned to expand the functionality – there a lot of ideas for this.
After editing a final image can be uploaded to the server and / or can be shared using social networks. When you upload the image to server, you can set a privacy flag if don’t wish to make your timera image public.
I would like to tell a little nuance about the difficulties encountered while implementing basic use-case (timeragraphy).
The first unpleasant surprise was the presence of two types of values UIDeviceOrientation. Recently I dealt with iOS-accelerometer concept and orientation of the device, and there were jsut four possible device orientations: UIDeviceOrientationPortrait, UIDeviceOrientationPortraitUpsideDown, UIDeviceOrientationLandscapeLeft, UIDeviceOrientationLandscapeRight. Device orientation is critical for timeragraphy, since overlay-image must be oriented properly relative to the old photo to avoid upside down effects. There are two additional screen orientation in modern iOS: UIDeviceOrientationFaceUp and UIDeviceOrientationFaceDown. I took me a lot of time to realize this fact.
Another interesting point related to camera screen was connected with the physical volume buttons on of device: in Standard Camera application, pressing the volume button triggers the shutter, which is very convenient.
For some reason, on our screen photographing these buttons caused no reaction, no matter what tricks we tried to apply, even forced “listening” to the notifications from the media system.
ViewController is subscribed to receive notifications on changing the volume
[[NSNotificationCenter defaultCenter]
addObserver:self
selector:@selector(volumeChanged:)
name:@"AVSystemController_SystemVolumeDidChangeNotification"
object:nil];
Later we’ve discovered the reason: this is due to the overlayView, where the user can change the transparency of the old image. The same exact behavior was found in other popular photo applications. At the same time, applications that use standard controls for photographing do not suffer from a lack of response to pressing the volume buttons.
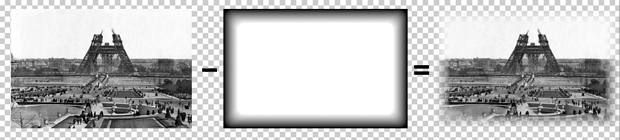
The most time was spent for implementing the time tunnel effect screen. The algorithm is a time-tunnel based on the method of subtracting the gradient mask of the original image: the darker pixels on the mask, the lower the transparency of the masked pixel image. All the magic is implemented using a standard framework CoreGraphics and functions CGImageCreateWithMask.
There are three steps of producing timera. Let’s use “Image A” for the background image, and “Image B” for the image in the foreground.
1. A rectangular mask with gradient edges is drawn and applied to the “Image B”. This was done to avoid sharp edges of time tunnel. User can rotate “Image B”. Thus, the mask is formed based on following parameters: size of the “Image B”, the rotation angle of “Image B”, the intensity of blurring the boundaries (adjustable slider). The resulting mask is subtracted from the “Image B”, and finally we get “Image B” with soft edges.
It was hard to implement a gradient rotation which is performing via CoreGraphics using matrix transformations of graphical context:
CGFloat angleInRadians = angle * (M_PI / 180);
CGContextRotateCTM(bmContext, angleInRadians);
It caused unexpected effect. Later I’ve figured out that a rotation is made around left upper corner of image.
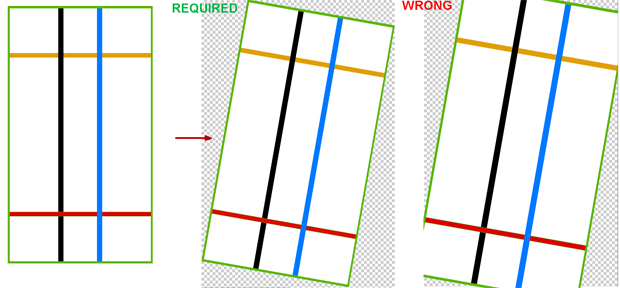
I even posted a question on stackoverflow after unsuccessful search of solution. Finally I’ve found a solution empirically and posted an answer to my own question.
Another surprise was the lack of a method to draw the right gradient for the mask (such as in the illustration). It does exists in CoreGraphics for elliptical shape, but not for rectangle (another self-answer).
2. The gradient mask is drawn and applied to “Image B”, derived from the treatment in the first stage. Unlike the first phase, the user can specify the type of mask: a rectangular or elliptical plus the same dimensions as the mask, the rotation angle, the intensity of blurring of the boundaries. Mask size and position of the user changes by fingers on the screen. It produces an image of time tunnel.

3. At the final stage the resulting image of time-tunnel is drawn in the proper coordinates on the “Image A”
I’d like to notice that CoreGraphics is not the most productive thing in the world, and this is especially noticeable on the old device, starting with the iPhone 4 and below.
In this regard, a number of measures to optimize the functional timeragraphy.
I found that the objects of type CGContextRef can be releases only within the graphic context they were created. It is very important to watch for the release of the objects CoreGraphics, because the Automatic Reference Count mechanism does not do this for the developer, causing memory leaks and out-of-memory crash. Leaked CoreGraphics objects can be found in the Memory Leaks profile-tool.
The second interesting task was the implementation of geo-location-mapping functionality. Initially timera was designed as a means of creating a time tunnels. According to many scientific theories space and time have a strong connection, so the location for the timera is very important aspect. The first implementation of Timera had only one method to find old photos: a user opens the screen with the map, find old photos around, choose one he likes and starts the process of timeragraphy. Special web service was developed. It returns all the old pictures in a currently visible area on the map screen (minlat, maxlat, minlng, maxlng). During the testing phase it became clear that the process should be optimized, since the number of pins in a particular area may reach big numbers so eventually it will be very difficult to choose any object in such a mess.
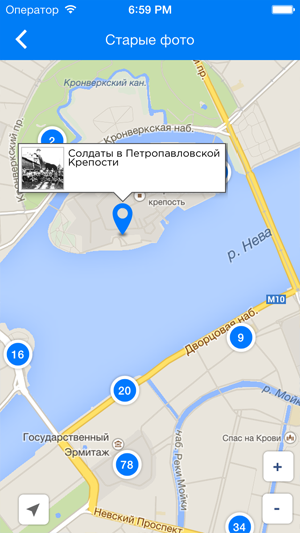 We decided to eliminate this problem by using clusters. Clusters are pins on the map associated with a group rather than with any particular object. Visually it is an icon with the number reflecting the count of grouped objects.
Initially we considered the possibility of implementing the cluster locally. Google Maps framework has the ability to do it with just a single line of code, but this feature was only available on Android. We have already begun the implementation of a local clusters on iOS when the collective mind has pushed a reasonable idea: it’s better to improve a web service returning the clusters. The server solution has a great advantage in terms of optimization: first of all it reduces a number of transferring objects (reduce traffic), and secondly the reduction in the cost of storing data locally (in Core Data).
Core Data Model also had to be modified: new entity MapCluster was added. It has attributes such as latitude, longitude, zoom, count, objectId
where
latitude, longitude – the coordinates of the cluster
zoom – zoom level, set by user
count – the number of objects that are bound to the cluster.
objectId – cluster can be tied to a specific object, so it must be displayed as a clickable this pin.
Next trick: If user changes the location of the map or zoom level, the first request is made in the local repository for the selected area, and clusters obtained from the collection are mapped, and the following request is sent to the server with the same parameters. If device is online and the server returns a response, local clusters from the database are removed and their graphical representation is updated.
I would like to tell couple of interesting things about iOS implementation of clusters. In order to draw a cluster we had to create a small class, which returns the image as a circle with a number, because the method of setIcon class GMSMarker GoogleMaps.framework expects it as UIImage.
As a result, the generated class is subclass of UIView, which contains nested elements that form the image of the cluster, final UIImage producing from it by using CoreGraphics screenshot technique:
-(UIImage *) renderedClusterImage {
    UIGraphicsBeginImageContextWithOptions(self.bounds.size, NO, [UIScreen mainScreen].scale);
    [self.layer renderInContext:UIGraphicsGetCurrentContext()];
    UIImage *capturedImage = UIGraphicsGetImageFromCurrentImageContext();
    UIGraphicsEndImageContext();
    return capturedImage;
}
I would also like to tell about one specific GoogleMaps framework feature. It is a way of creating of a custom representation InfoWindow (the window with the description that appears when the user taps the pin).
We use Google map delegate method to display the information window
- (UIView *)mapView:(GMSMapView *)mapView markerInfoWindow:(GMSMarker *)marker;
as you can see, this method should return UIView object. We can have different components (UILabel, UIImageView etc) on this view, and they all will be displayed next to your ping. Nothing bad can be foreseen I thought. However, in our case it was necessary to redraw the window due to the fact that the preview image at the time of opening InfoWindow can be not downloaded from the server. In this case, the image starts loading, and when it’s done it needs to be redrawn InfoWindow. And this is the place where unpredictable thing happened. I thought it would be enough to store a pointer to the UIView, which we return in the delegate method, and then change the UIImageView image property. I’ve figured out that GoogleMaps rasterizes (converts into UIImage) given UIView, perhaps for reasons of optimization, so all attempts to redraw it failed.
So we had to invent the hack. When tap happens a blank InfoWindow shows, if there is no image data in local database, we start the download process, and then we do the following:
- (UIView *)mapView:(GMSMapView *)mapView markerInfoWindow:(GMSMarker *)marker {
    TMMapImagePreview *view =  [[TMMapImagePreview alloc] initWithFrame:CGRectMake(0, 0, mapView.frame.size.width * 0.7, 64)];
    id image = marker.userData;
    NSData *imgData = (((MapCluster *)image).image).imageThumbnailData;
    if (imgData)
        view.imgView.image = [UIImage imageWithData:imgData];
    else {
        NSString * url = (((MapCluster *)image).image).imageThumbnailURL;
        if (url) {
            [[ImageCache sharedInstance]
             downloadDataAtURL:[NSURL URLWithString:url]
             completionHandler:^(NSData *data) {
            	(((MapCluster *)image).image).imageThumbnailData = data;
                [marker setSnippet:@""];
                [mapView_ setSelectedMarker:marker];
             }];
        }
    }
    return view;
}
here TMMapImagePreview is a class that inherits from UIView, it constructs the layout of InfoWindow. All the magic of the forced redrawing is inside compeltion-block method downloadDataAtURL Singleton ImageCache, which is not difficult to guess, is performing a downloading the graphical content.